

5S Tool Control Best Practices
Tool control is an important tenet of 5S methodology.
Time wasted searching for a tool is a significant problem for many operations. In fact, studies show that nearly 20% of a worker’s day is spent on wasteful activities such as searching for tools.
In a 2020 webinar, David Visco, author of 5s Made Easy and founder of the 5S Store, shared tips and tricks for 5S organization and tool control. This post is a transcript of that webinar.
You will learn:
- Why tool control should be a part of your 5S system.
- Different methods of tool control; what is best for when?
- The benefits of color-coding tools
- Methods to help sustain tool control standards
Tool Control supplies from The 5S Store
Transcript from the Tool Control Best Practices Webinar
Maribeth (host):
I’d like to introduce our speaker. David Visco is a 5S expert. Beginning in 1985, David launched his career as a warehouse control manager running a distribution center that managed inventory of over $500 million in value. As he furthered his career, he gained extensive experience across warehouse, production planning, logistics, and materials management. Using 5S in the workplace, he saw a unique opportunity and a need for a 5S resource.
David:
Thanks, Maribeth.
Maribeth:
In 2006, he founded the 5S Store, the first online store dedicated entirely to 5S. The 5S Store provides a massive range of 5S products. In 2015, his book, 5S Made Easy, was published. Today he frequently speaks publicly on the topic of 5S best practices. Take it away, David.
David:
Thank you, Maribeth, and thanks for coming today, everybody. I hope you’re doing well. All right, let’s talk about some tool control best practices. So our agenda today: Why tool control should be proud of your 5S system. Different methods of tool control; what is best for when? The benefits of color-coding tools. The methods to help sustain tool control standards. How tool control can help reduce cross-contamination in the workplace. It’s a pretty hot topic these days. And at the end, we’ll take questions. All right.
Why tool control should be part of your 5S system.
David:
So you may not be aware of this, but 25% of the workday, the average worker spends searching for tools, materials, or information. 25%. Imagine if you have 10, 50 or 100 employees or workers on the floor. How much time is being wasted just searching for tools, materials, or info? Regarding tools, proper tool control can help improve safety as there’s less opportunity to get hurt digging into toolboxes and drawers. I don’t know about you, but I know there’s been plenty of times I’ve done that on my own at my house or in that lovely utensil drawer that happens to have a knife in it and getting cut up and whatnot.
David:
That happens at work way too often, so tool control can help remove that. The morale of your team’s going to increase too, because as tool control reduces the stress of searching for what’s needed to do the job. Tool control, so it helps as a visual reminder at a glance when something is missing and what it is that’s missing. It also helps increasing efficiency by repeated, learned behavior. So it’s also known as muscle memory. Now, if you’re always reaching for that tool in the same spot all the time that you’ve set out with the tool shadow or whatnot, you’re just going to be more efficient because you always got to know where that tool is.
David:
Unfortunately, the pandemic caused an increase in germ-spreading concerns, right? So proper tool control is an effective method, it helps reduce that spread. So I’m going to go through a number of different methods of tool control.
Different methods of tool control; what is best when?
Pegboards:
First one we’re going to talk about is pegboards. They’re available for you to put anywhere really. They come in steel or polypropylene, and depending on your needs, the steel is really good if you have a lot of heavy duty tools, and it’s just a more robust environment, you’ve got the steel, or for just a regular manufacturing space, you’ve got the polypropylene. They’re both great.
They come with dozens of different hooks that you can use for these. So you can really custom make them fit your needs. The polypropylene is eight square feet per board. So if you get two boards in a pack, you’ve got 16 square feet to organize your tools with, and you just screw them to a wall. With the steel, they come in multiple sizes. You’ve got 24 by 24 inches, 18 by 36, and 24 by 42 inches. Okay, so we’re going to move on from there. You’ve also got those boards, the steel ones, that could be configured into these space-efficient, mobile tool boards.
So the peripheral board, which is the item on the left, can hold up to 10 sliding boards within a frame. That frame that you see them in, you can move it wherever you need it, so you don’t have to install anything. The great thing is, you can just put it where you need it in the best of use. The idea here is, this will hold up to 10 panels in one frame. In the picture here, you’ll see there are five. But the great thing is, space efficiency wise, you could just take these and roll them out, put all the tools you need and roll them right back in. Each panel, each door will hold up to 220 pounds. So you could get a lot of tools in there and a lot of heft.
Then you’ve got the double-sided mobile cart, which is another great solution, so that you can put tools wherever you need them. Right? They have heavy duty casters, which is great, so you can load hundreds of pounds of tools on that mobile tool board. The idea behind them being mobile is you could just move them easily. And the hooks for these are in the dozens so you can just really configure whatever it is you need.
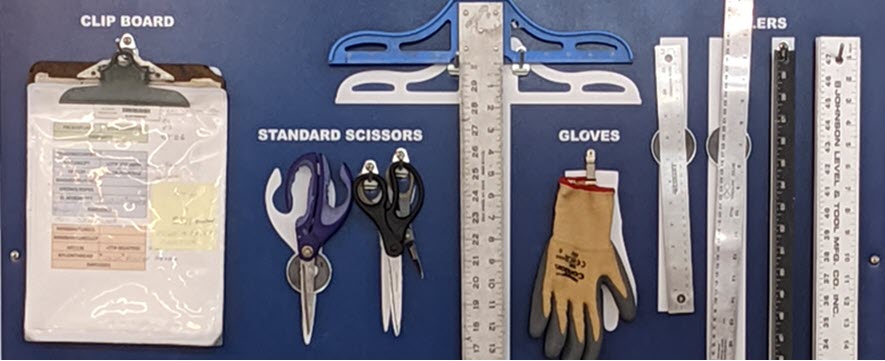
Okay, from there we’re going to talk about tool shadow boards. So these have become really popular the last few years. The shadow boards are available in off-the-shelf or custom. There are three type of boards depending on your needs. So there’s one type of board that’s for everyday use in a warehouse and then there’s others that are good for food grade and constant caustic wash downs. So you just pick the material that you need for your particular situation. The great thing is they’re all scratch-resistant, UV-resistant, and chemical-resistant, and they won’t rust. So they’re very heavy duty solution. With the off-the-shelf boards, the picture on the right, the benefits of those is they’re heavy duty, they’re wall-mounted, so you could just put them on a wall that you happen to have available.
Actually, we had one client that needed these on every single workstation. So I think there were 32 workstations in this area, and they actually mounted them right to the piece of equipment, which was pretty cool. Now for other customers, and actually that customer too, he needed some of those that would be mobile. So there’s a mobile frame available for this so that you can put them wherever you need to. They really improve efficiency because, how many times have you been in a manufacturing floor and you’ve gone looking for a broom or a dust pan? All that time is just wasted.
Cleaning Tool Shadow Boards
So with these that I made for the most common cleaning tools that are out there, it’s a nice, simple solution for you. And the great thing is, they ship within a day or two, so they’re always available. They can be put on a wall or mobile as you see there and they’re made to your specs. So whatever it is you need on there, you work with the custom team and you have it made however you need it. You can put your logo on there or our artists can also design it to really wow. So if you have a lot of company tours or whatnot and you really want it to wow people that show up, we can do that too.
Other folks just want a very nice, simple, custom board made to put wherever they need it. We can do that as well. Again, there’s hundreds of hooks available for these. We’ve seen often where people have had tools that are one-offs, right? So they’re probably made in the manufacturing place for some special need and there may not be a particular already made hook for that.
Foam Tool Organizers
Next, we have foam tool organizers. Who doesn’t love foam tool, right? So it’s been around for quite a while. It helps improve safety, because like we talked before, if you’ve got a whole drawer here full of tools, you can easily cut yourself. The great thing is, with the double, two colors here, when the tool is out, it’s very evident what’s missing, which is nice. They come in three different options. It’s do it yourself, where you get a kit and you cut it out on your own, which is always a lot of fun. For anybody that’s done that, they know how much fun that can be. We have various sizes available as well. Then we also have custom sizes.
The great thing with tool foam is it’s so easy to use as a solution, just to make things easier on your folks. What we can also do is we can actually do the cutouts for you. So if you’ve ever cut out foam in the past, you probably realize it doesn’t look nearly as nice as what you see there in the picture, right? It also takes quite a bit of time to do. We had one client that was doing 36 drawers like this and they actually had one guy doing them for about a week.
It’s a lot of labor to do them all on your own. So what we do is, we’re able to do that for you. You work with that team and we do all the cutouts for you. All you do is order, and boom, it shows up and you put them in your drawer. Keep in mind though, if you’re in constant change always changing out the tools that you’re using, tool foam may not be the best solution for you, because you’re always going to be cutting them up. But if you have some standards in place and you’re always using the same tools, it’s really a nice, simple solution.
Tool Shadow Tape
So from there we have tool shadow tape. So this is a budget-friendly approach. So what we can do here is, you have tool shadow tape that’s available on rolls, or we have these precut shadow tapes, 50 of the most popular tools that are out there, like a hammer, a screwdriver or whatnot. Both of these are to apply and to remove when you need them to. So if you lay it down, right? So if it was just like a vinyl tape, just a regular vinyl tape, and you put that down on the board, first of all, doing that would be really painful and it would stick to itself or that vinyl tape trying to get it off can be a real pain and you wouldn’t be able to reapply it.
With both of these materials here, if you had to remove it, you could do so and it’ll last for a couple of changes. So that’s really great. They’re high performance and they’ll last and they’re also fade-resistant. So with the precuts, you’ve got a couple of blank sheets in the back too. So you get the precut shapes and then you got a couple of blanks in the back if you have certain tools that you might not do on your own, or you could get a whole roll. If you get a whole roll, you just simply on the back of the tool shadow tape, you put your tool, then you trace it out the pencil or whatnot, you get a pair of scissors, you cut it out, and then you peel the backing and you place the tool shadow on the board, or wherever it is you using it.
It’s that simple. It’s a great, great product. So they’re great for tool boards. You can even use them for cleaning stations. If you want to do your own shadows for rooms or dust mops, or whatnot, you could do that. They’re also good for medical instruments set up. So if you have any kind of a gauge or whatnot, you can create a simple little tool shadow for that too.
I have seen people use the shadows even when they doing 5S in the office. So if you want to turn around and put a tool shadow down for where your stapler is going to be, have at it. One thing I would suggest you do though is you want to label that tool shadow with the word stapler on the shadow itself, not below it. Because the idea is when it’s missing, you want to know what it is that’s supposed to go back there. Okay? The thing is is, this is a nice, neat, and easy way to organize your workspace. They’re also available in many different colors.
The benefits of color-coding tools
If you try to color coordinate or keep certain tools and certain areas, you can have the color coordinating there to keep everything in place. Then we mentioned color-coding there. You can also color-code your tools with items such as Plasti Dip, a pretty common material. The idea here is, you’ll take the tools, you’ll dip in the color that you want, and then you dry, and there you go. Now you get a nice, color-coded tool.
Where we see people doing a lot is, let’s say they have a bunch of work cells, and in one work cell, maybe they decide that work cell is going to be green. Okay? So you might use the Plasti Dip in green to dip your tools, and add color-coded cleaning tools as well with green. So you’d have a green barrel, green push broom, green dust pan, et cetera, and the tools would also line up with that too.
I’ve also seen people just use a colored vinyl tape to mark the hand of a tool. So that works as well. Where this really helps big time is in the whole cross-contamination issue that everybody’s concerned about these days. If each of your work cells has a standard of being a certain color, you should never see your color in somebody else’s work cell. Right? If that happens, that means that some standard that you put in place broke down. So this is a nice, nice tool to use, if you will, for raising issues to the surface, because if somebody is grabbing your tool, that means they either lost theirs or they just need your tool as well. Who knows what?
The idea is to keep the tools organized and sufficiently marked for your particular work cell so that it reduces cross-contamination, because you don’t want to be touching somebody else’s tools, at least not in today’s world.
Methods to help sustain tool control standards
So how do you go about implementing these tool control changes if you’ve never had that before? As with any change, the best way to avoid any issues you’re going to have is to make sure you include everybody. One way to do that with tool control is to run a pilot. Same as when we implement 5S all across the site, we always choose one area first to play around with.
Build a Team
The best way to do that is pick one area that you know that you can succeed in, right? Something that’s not overwhelming. Okay? What you can do is get everybody that’s in the area together and you’re going to talk things through. So first you’ll have your kickoff, and then from there, what you’re going to want to do is find a leader. Get somebody in that group that’s going to be the lead and help keep things moving forward once the implementation is done. Then like I said, build consensus, right? Have an open discussion, reviewing the benefits and tool control with everybody. So we’ve already gone through a bunch of benefits there so you could go back through the slide and share that.
But you want to make sure, with any change, that people understand why they’re even going to bother doing it, right? Not just because the boss said so. Okay? As with any change, you want to make sure that people are all on board. So to do that, have a brainstorming session, get everybody feeling comfortable with… given their ideas, discussing their concerns, right as it says, handle objections. You want to make sure everybody’s objection is addressed, and that you guys, you just figure out exactly how you’re going to do it and what’s going to work and what isn’t.
Have a Red Tag Event
From there, what I’d suggest doing, before you start implementing the tool control itself, have a red-tag event. It makes no sense to put a tool that you never use into a tool control situation. So why not have your red-tag event, clear out, go through all the desks, all the toolboxes, everything that you have and make sure that you only have the tools that you need. Then once you’ve done that, you’ve set it up for success. You went through all these steps and you’re good to go to implement it. From there, you want to document and roll up the program across the site, or maybe just the next work cell or the next department. You don’t have to do the entire company all at once after you’ve done your pilot.
You can pick and choose depending on the size of your place and what any challenges might be or production needs or whatnot. But as with any new policy, you’ll want to get it documented and then communicated to all the employees that it affects, right? Maybe a lunch and learn. It’s a nice way to implement something new. Get everybody together, have some pizza, whatnot, and talk about this new thing that you’re going to implement. Make sure that it’s an open quorum. People should really feel comfortable asking questions, right? Because maybe during the pilot though, some questions weren’t brought up.
Keep the Ball Rolling
So as you’re rolling it out to more people, it’s continuous improvement, right? So you’re always supposed to be making it a little bit better every day. Frequent updates on progress helps to put some social pressure on those that have not yet adopted. So what’s that mean? You want to make sure that this becomes part of your everyday life from what everybody does. So to do that, you’re going to want to monitor the situation. Okay. And you want to make sure that people are following the standards. So how do you do that? You’re going to have to sustain, put controls and then sustain it.
So if you have a weekly department huddle, which I’d suggest you do, make sure tool control’s on that list, make sure that all the solutions that you’ve put in place are easily accessible. So what I’m talking about there is, if you’ve decided to put pegboards in place, you want to make sure you have plenty of hooks, right? The worst thing that could happen is somebody wants to go add a new tool to the board and they don’t have the proper hook available. So set up Kanbans for your tool hooks. Same thing with the tool shadow tape. If you’re going to use the DIY tool shadow tape, make sure you have a Kanban in place so that you never run out.
You also want to make sure to hold the team accountable for following the new standard. That’s really important. So if everybody’s agreed on the standard and you’re implementing it and you’re doing it, whatnot, for those folks that maybe aren’t following along, you need to hold them accountable. Really important. Again, you don’t have to seek perfection, right? You’re always trying to improve, small improvements regularly. I’d also suggest, consider adding tool control to your 5S checklist, your daily 5S checklist, and your weekly 5S audits.
Over time, as audits are meant to do, you’ll find that the improvements will come along, because if you have an open communication system through your audit process, you’ll be constantly improving as you go. Okay, with that, I’m going to give it to Maribeth for questions.
Audience Questions
Maribeth:
Thanks, David. And thanks to the viewers who are sending in questions as we speak. So let’s get started with David responding. Our first question for you, David, is: Explain how Kanban can be used in sustaining tool control.
David:
Well, the only place where Kanban is going to come in play is just making sure that you never run out of the tool control tools, if you will, that you’ve decided to use. So let’s say that as a team you’ve decided you want pegboards. So you want to make sure that you use Kanbans to keep track of when you need to reorder the pegboards or the tool shadow tape or any other material there. It’s really Kanbans just really in place just to make sure that you never run out of the materials that you’ve decided to implement. As far as tools itself, if that’s what you’re talking about, that’s a different situation.
Tools itself is like, and I’m not sure if that’s what the person meant, like how do I use Kanban to make sure I never run out of hammers, screwdrivers, nuts or that type of thing? That’s like any material that you want to put under Kanban and control. You just set the Kanbans in place. I’m not sure if I totally understand the question.
Maribeth:
Thanks, David. We have another question that has rolled in about 5S basics. You had mentioned a red-tag event, can you please explain what a red-tag event is?
David:
Oh, sure. Sometimes I assume from the 5S Store that everybody knows what that is. So shame on me. A red-tag event is part of the first part of 5S, which is for sort. So the idea with the red-tag event is you get a handful of red tags handy and pens and whatever, and then you get the group together. Everybody goes through the chosen area all at once. So you’re opening up every draw, every cabinet, every crevice, every corner, top to bottom, left to right, that entire area should be touched to find anything at all that isn’t needed to get the job done. On the right tag, they have certain dispositions form.
So what you do is you have a red tag area, so anything that you think should be in the red tag, that should get red-tagged or get moved to the red tag area. Then the supervisors and the people in the area will actually figure out what should be done with those tools. Maybe you don’t need them anymore, so you can have a giveaway, a company giveaway, or maybe there’s other departments that need them. One of the great things of red tagging is a lot of materials show up that nobody knew was there, and then once your catalog them and you keep track of them, you can save a ton of money because other departments might need what it is that’s hidden in your department.
That’s why I’d suggested red tagging first so that you get everything out of there before you set it in order.
Maribeth:
Great. Thanks, David. Here’s another great question about how you use boards. If I have a tool that I’m constantly using, am I supposed to take it off the board, use it, and then immediately put it back?
David:
So that’s a great question. We actually get that question a lot. The answer there would be no. So if you’re continually using a tool, I mean, all day long, maybe putting it down for a minute or two and using it again and whatever, you’re not going to keep putting it back in the shadow. That’s just silly, right? The idea would be that if you have to leave the work area for a bit, either go to the restroom or break or leave for the day for that matter, you want to make sure that you always have all your tools put away neat and orderly so if anybody else should need them, like a second shift for example, they know exactly where to find them.
Maribeth:
Great. Here’s our next question. So here’s somebody who’s looking for some real honesty. They said, “How difficult is it really to do your own cutouts in foam?“
David:
Well, for anybody that’s done them, you could all answer the question. It can be painful. It depends on what you want though. So if you don’t care how it looks and you just want the function, that which is fine, by the way, it doesn’t have to be beautiful and not by a long stretch, but if you don’t care how it looks and you’ve got the time to do it, you can do it, but it takes time. It’s easy enough to cut. So if you have a utility blade or an Exacto knife, you can cut them out easy enough.
It just, it does take an effort. And if you have a lot of drawers to do, it’s going to take you some time, and truth be told, your hands will get a little worn as you’re going on from one tool drawer to the next. But if you don’t have to do a lot all at once, there’s no reason why you can’t. It isn’t that difficult, it just takes time.
Maribeth:
Next question that’s come in asks, “What type of businesses do you think benefit most from using tool control methods?“
David:
Wow, that’s interesting. Well, if we’re talking like hand tools, it would be any manufacturing facility, really. I mean, anytime that you have a lot of different tools that you’re using and that other people need too, if you want to make sure that you’ve got some controls in place so that you know exactly where to go and where to get your tools, the other benefit of all this of course is that you can work more efficiently if you know exactly what your tools are like I mentioned. So really anybody that has tools in their operation should put tool control in place because it’ll just make life easier for them.
Where I’ve seen tool control used a lot is in the food service industry. They’ve use the color-coded cleaning tools for food service. That works out really well that way because you need to have line clearance in food manufacturing, because you don’t want a squeegee, for example, from one department making its way over to another department that’s using different meats and whatever they’re doing there. So it’s really pretty broad, there isn’t one in particular. If you keep losing your tools and you’re always searching for your tools, regardless of what company or business type you are in, you need tool control. It’s really that simple.
Maribeth:
I think I need tool control in my garage!
David:
I hear that a lot.
Maribeth:
So our next viewer asks, “What’s your favorite tool control method? What works best?”
David:
Well, it would depend on the need. I think tool shadow tape’s pretty cool. It’s super easy and you get the user involved and you can just make it your own, which is all part of it, right? You’re developing it, designing it, and making it your own. From a DIY standpoint, doing it yourself. I think that’s great. I think the advent of the tool control boards, the shadow boards, is really pretty sweet too, because it looks great and it’s so visual and so useful and efficient, especially if you make it mobile. I guess those would be my two, the DIY shadow tape and the tool shadow boards. They’re really pretty neat, very useful.
Maribeth:
Great. We’re onto our final question here. What are some ways to reinforce tool control in a business that runs multiple shifts?
David:
That’s a great question. Yeah, we see that a lot, right? Shift change. The best thing to do there, if you’ve got let’s just say shift one and shift two. Shift two would do a daily checklist. So when shift two comes on, they would have this checklist where they would verify that… I mean, it should be for any of the 5S categories, but for tool control, for example, let’s just say you made a tool control checklist, four or five things you’ve got to check off, all the tools we’ll put back properly, there was nothing missing, et cetera, et cetera. You just make this checklist.
The second shift when they come in, they would fill that checklist out and there should also be a place they can make any notes that they might want to make. So then maybe there’s a third shift too. They would do the same thing. So in the morning, when the first shift comes back in, they’re going to be doing the same thing for the third shift. So the first shift would wind up doing a 5S checklist for the third shift. So everybody’s checking on each other to make sure that the tool control standards that were put in place are actually working and that they’re being followed.
It’s really important that the management supervisors make sure that everybody knows this isn’t to pester one another or to point fingers, it’s all about just improving it for one another so that everybody can have an easier, more efficient day due to these new things that are put in place. So over time, that’ll help a lot.
Maribeth:
That was our final question, David.
David:
Okay. Thanks for all the questions. Take care.